Tuesday, January 31, 2012

Hose, Hose, Hose.... (and no it's not the Christmas edition )

 Hello all,

Well here we are guys the first article on the new website, took me a few days to get it set up and if anyone has any comments please feel free to send them to me ( Flattcat@yahoo.com).


 OK so I'm gonna talk about hoses today. I have been working on the plague priest costume for awhile now and one of the things I was worried about in cost (since well this is the cheap costuming blog's flagship costume) was the hoses going from my mask to my skull icon.


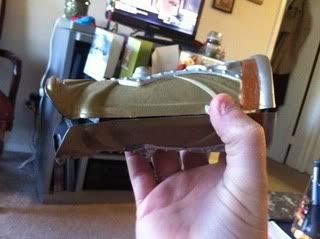
I decided to go and price this type of hose at Lowes and Home Depot and the lowest price I was able to find was between $5.00 and $7.00 a foot, and I was gonna prolly need a few feet. So i decided that was one of the things I decided to put off to the side to see if I could just find some free hoses somewhere. Well as I was looking for treasures at my local Dollar Tree I found this:
This is actually a product they sale that when you swing it around by the end it whistles and surprisingly they are called Whistle tubes (click picture for link):


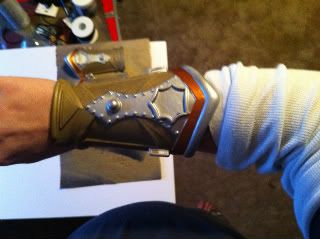
So when I looked at them that's when it hit me "holy crap there is my ribbed hoses" so I proceeded to buy 3 of them to try them out. Turns out the flared end of the tubes fit the holes in my mask like a glove:

                           
These hoses are awesome because they will shape with just the heat of your normal everyday hair dryer, Hit them with the highest heat setting till you get them the shape you want them and then shit them with just the fan setting. When you are bending them don't try to do too much at one time cause they will collapse in on themselves.
 
OK so on to painting them now. 
I will warn you that they don't take paint very well if you dont rough them up a little bit with some fine grit sandpaper (remember kids wash them off after you sand them to get rid of the grit) I painted mine with the old stand-by my black Krylon fusion spray paint. 
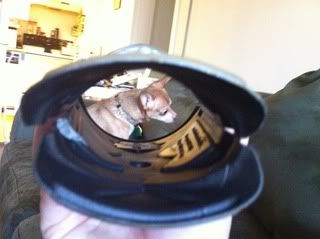
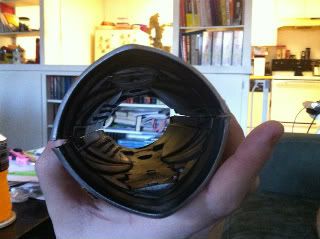
 Yes that is a paper clip I used as a hook so I could spray the whole thing at one time but that's a whole different article. So now I have a $1.00 ribbed black hosing that looks as good as the expensive stuff. this is a picture of what I'm planning on doing with them, These hoses are not painted since they are not the ones I'm going to use, they are just so I can figure out sizes
And yes that is a Warhammer 40K book holding the goggles in place. I will be doing an article in the near future on the skull Icon so stay tuned. Now remember that this is a work in progress so this may not be the last you see of the hoses. Well ladies and gents that's all I have for you today so say tuned for our next article .


Wednesday, January 25, 2012

By the prick of my thumb (easy mutation claws)

Hello again all!!!
First I wanna apologize to all our loyal reader (if we have that many.....lol) about the stretch between articles. I seem to have gotten caught up with this thing called real life (and it sucks). For you that don't know me in real life let me share a little about myself before we get going. I left Active army back in 2008 and joined the reserves and have a contract going on till 2014, well lets just say that some "health"  issues have caught up with me in the long run and I may be ending my Army career a tad early. Below is a pic of my last flight home from the sand box. Now that I shared that little bit lets get on to today's topic....
 MUTANT CLAWS!!!!!!
Now when I say mutant claws I know the first thing that you hear in your head is "SNIKT" thanks to Wolverine. But now we are talking the kind of claws that you receive for being a good little chaos worshiper. OK so now lets go back to our favorite cheap store..... THE $1.00 STORE!!!
OK so as you see above we are starting with your plain old monster fingers, you can get 10 in a pack for $1.00. the first thing you need to do is try them on to get an idea of how they fit and where you are going to have to cut them down at.

As you can see in the above pix I had to cut them down a bit for them to fit on my big kid fingers, as you can see a little sloppy cutting but dont worry you want see them. The plan is that with the Plague preacher is that where ever there is open skin it will be covered by nasty gauze.
So that brown color just doesn't seem to fit in with the costume does it????
I used the Rotting flesh paint color and gave them a good coating but not thick enough to hide all the brown color.
and before some ask...... YES that is the rotating chamber of the Nerf Maverick...... hey it was around and it worked to help them stand up. so as you can see i left the nails brown for a good reason..... YES I am going to use nail polish to paint them!!! after raiding the Girlfriends fingernail polishes I finally settled on black. These plastic nails were just like trying to paint real finger nails, you couldn't just slap a thick coat on and go for it. you had to lay the polish down in layers and let them dry.
and remember if you not wearing some of your paint then you are doing it wrong.
So after letting the nail polish dry for a day or so this is how they turned out:
As you see they fit a little better now and look a tad dead and nasty, a piece of advice I can give you it that if you have a big thumb (like yours truly) you may have to slit the bottom of the thumb claw. These fit really tight soo we shall see what happens when I start sweating with them on. Well ladies and gents here we are at the end of another article about cheap costuming. If there is something you wanna see an article on, or want to know please feel free to drop me and email and I will see what I can do. If I cant write an article about it I will try to see if I can find a guest writer to help out.

Sharp and Pointy.......(plague knife W.I.P.)

When I started collecting the stuff for the costume I debated between a plague knife and a plague sword, well after thinking about carrying a sword and banner or knife and banner the knife won out. No need looking like the pack-mule of Nurgle. As Halloween was winding down I found this awesome looking knife at Target for $3.00 dollars:
 
After looking at it for a few i decided to cut it in half and use part for the knife and the other half for something in the future ( starting to have a huge Bitz box now)

After it setting around the house for a bit i decided to work on it since the weather here in GA has been in the 20's (-5 centigrade). So to go from that metal look to an infected stone look I had to go dig thru my paints box and decided on this color palette:
 

The first thing I did was spray the blade with beaten silver spray and then dry-brushed on the grey and stone colors to dull up the silver and give it that quartz/granite look:

After the main paint dried i went back over the whole thing with green wash to make it look infected:

1ST COAT:

2ND COAT:

FINAL COAT:
So after the blade dried we added a thick coat of a glossy varnish (gave it that wet look and tied the colors together. After the blade dried and with a little help and advice from my GF (yes I have one so stop laffing) we decided to get some leather strips( $2.77 for 3 feet of it at Hobby Lobby) and wrap the handle. I decided to use some of the brass studs (aka Carpet tacks) I had laying around to help stick the leather to the plastic handle and also to add some details ( yes if you notice everything is in groups of 3 aka Nurgles symbol):
 
After almost finishing up we decided to use some of the left over leather strip to make a loop to hang from a belt:
 

So here is the final knife... right now its finished for now:


Stay tuned I am going to be posting up some pics of some of the finds I have made at the Dollar store and also goodwill..

$1.00 Store Klingon Bracers......

OK wayyyy back when this blog was just an idea , this was one of the ideas that set the wheels in motion for the blog. I present you you the $1.00 store bracers one for the flagship projects of Sixpence.....
So with the holidays over I decided to swing in and post up some pics of a project I am working on. I have been working on my Renaissance Klingon for a while. 
So I decided I needed a pair of bracers, after looking around and seeing the cost I decided to see what I could do cheap. While I was looking at the $1.00 store and saw what was supposed to be a hand gauntlet for kids but I looked at in and a little brain storming I bought 2 sets of them (2 to a set). So after a little cutting and shaping, I sprayed them with a nice Gold paint I had and ended up with this:

Got these painted and decided they needed a little more character so after me and my Girlfriend sat around and talked about it I decided to do some taping and ad some silver to them:

So now we have silver and decided to add a little bronze to them to help break up the colors (the color I used is called Dwarf bronze) :
This is a great paint but the one problem it has is that it can take multiple coats to get the color coverage you want ( the above picture is just one coat of it) after a few another coat here is what we have now:

and what it looks like on my arm:


Since we bout 2 sets of them this is the idea we are going with:
Side

Front: wave hello to Rudy all


back


We are not 100% sure right now how we are going to mount them together and I know that we are going to be adding in some Maroon to the star design on the top. I will be posting some more updates as we get more done.
EXTRA, EXTRA
READ ALL ABOUT IT!!!!!!

This is some exciting news that I wanted to share with you all today.... we made contact with Sci-Fi Summer Con Atlanta  founder Chris Jones back in the beginning of November about the possibility of  doing a costume panel at the 2012 convention. On December 11th he contacted me by email to let us know that we are a GO for the convention. Below is a screen shot of us listed on the "official" Sci-Fi Summer Con web page
I (Stumpy) will also be sitting on the judging panel for the costume contest (lets get those bribes rolling in!!!). As soon as I have a date and time I will post it up to let you all know where you can come and see us at... Right now the panelist are myself, Dana Tyler, and ?? (we are still looking for someone that knows a thing or two about cheap make-up, if interested email me). Also one of us (myself or Dana Tyler will be tweeting at the Con also). So here is your chance to come out and meet us face to face and tell us how bad we are or how much you enjoy us.
Sci-Fi Summer Con Atlanta has this to say about its self:
Sci fi summer con is a local Atlanta small inexpensive, recreational convention with scifi / fantasy / horror / comics / anime / gaming themes. lots of guest speakers, discussion panels, tabletop games, movies, live performances, activities, and fun!

Patient Zero

Hello again all.... its the time that I know a few have been waiting for, the beginning post of the Plague Preacher. So let me start off with a picture of the costume that has inspired me to work on this costume:
This is a model that is offered from Forge World (a company that makes high quality models for Warhammer 40K). I saw this model towards the end of Dragon*Con last year and it stuck in my head. First and foremost I am not trying to copy this costume I am using it for inspiration, so if you see something I'm doing and you can find it on the model don't freak out. Ok so now we have the idea time to get the materials together. After a few trips to Dollar store (during the Halloween seasons) We acquired prolly 90% of the costume at a very low cost, as you can see bellow:
The most expensive part of the costume will prolly be the robe component of the costume (which my Girlfriend is gonna hate making) the cost of it is going to be in the material to make it. One of the items I was very excited about getting for FREE was the respirator  for the face mask
This was an example of just asking around for stuff people are gonna get rid of. The person I got this from was going to toss it because he had gotten a better one. Before you say ewwwwwwww it had only been used once and I cleaned it hardcore with rubbing alcohol. So after we started getting the peices together it was time to try and lay out the idea for what goes where. So I took the main photo and slapped into paint and made a few notes:
Here is where I'm gonna throw out a lesson I learned last year....... PLAN OUT YOUR COSTUME!!!!! We made the mistake last year of trying to do everything by the seat of our pants and got lost and screwed up a few times.
After seeing the "plan" we decided to start seeing how things fir together. The first thing I did was take the filters off the side of the mask (this was accomplished with a small pair of wire cutters:
  After we  got the filters off we decide to see how the "hoses" looked on the mask:
Thunder cats HOOOOOOO!!!!! ok so this was the picture that made me realize that the mask harness had to go cause it made the mask sit weird. We are still working on a new mounting idea. So I attacked it again with my small wire cutter and ended up with this:
And here it is with the hoses inserted:
Yes the trashcan is labeled NO FOOD for a reason..... I dont need any small buggy helpers.
During this time we were still looking around for "parts" for the costume and while we were at target we found an awesome prop dagger that we relized would look awesome if we made a few "adjustments" to it:
Yes stop laffing I wear ninja turtle sleep pants.... after a few quick slices with a small saw we ended up with a Plague knife:
The next plan for this piece is a quick paint job and some leather wrapping on the handle and a few plague symbols added.
So now the Halloween season is over and done with and we raided all the stores for Halloween leftovers and got some awesome deals on items. Below is a pic of one of the deals we got:
This was part of a "skeleton in a bag deal" we got that was on sale from $15.00 down to $4.00, and all the bones in the bag are life-size!!!. Little word of wisdom after the Halloween season grab up as many skulls and bones as you can because once Halloween is over and done with skulls and bones are hard to find unless you wanna pay high cost on Ebay or costuming stores.
After looking at the skull I realized that it need a little work to seem a little more "real" so after 3 hours of looking on-line for a 3D skull I could rotate I broke out the early Christmas present from the girlfriend (aka the Dremel) and started opening up a few spots on it:
Yes I know touch up is needed..... Stay tuned.
Now on to a few maks updates. after cutting off the straps we noticed that the center nose piece was kinda plain so we  decide to drill a few holes into it as you can see in one of the pictures the source of much time lost is visible (damn you Skyrim!!!!!!) and of course as I have said before Coca-Cola, a gamers best friend.
After the drilling we noticed that the centerpiece was a tad bit see thru so we decided to ad a little paint to it to cover it up (Rotting Flesh-----YES that is the name of the paint). Took 2 coats of paint to cover it up completely the first pic is the the first coat and the second is the final coat with one of our chihuahuas (Rudy is his name) peeking thru the center nose hole, everyone say hello.
Well ladies and gents that's all I have to report right now on this costume but stay tuned we will be adding more post and also adding in some more articles and also stay tuned in a few moments for a really cool thing that has been in the works and has finally gotten confirmed so now I can talk about it.

Bread from the bakery, but homemade is best

Hello again all long time no see huh.... Well real life has caught up with me for a little bit but don't worry I will be back soon with the Plague Preacher up date I have been promising you since the start of this blog. To hold you guys over for the week we have another article by Seraphic Machine  from Obscurus Crusade.
Stumpy
So away we go:
I don't know much about how these things are outside of Europe, but here hobby stores (you know, stores that target bored middle-aged housewives compared to DIY stores that target guys hassled by their bored wives with "Oh, darling, you should paint the fence white so it will go with these wonderful patchwork pillows I made for the rocking chair on the front porch! Bone white, not eggshell white please.") tend to sell a lot of stuff you can buy cheaper at other places, that are specialized in certain fields (home improvement, DIY, plumbing, electronics etc.). It might cost you some time, but you'll get a bigger package of plaster, wire, various glues, paints (and brushes!) for a lot less. You will also have a larger selection of all these things than in hobby stores.
Buying in bulk is also an option, you never know when you will need more of that neon green plumbing tube. (No, really, you can never know. Just remember the feeling when you need exactly that and it's sold out in the whole freaking city!)
The appointed basket at the gate of our apartment house is always full and there are at least 2-3 types of advertisement catalogues from DIY stores, so one can even compare prices.
The secret again is that one should not leave things to be done at the last moment, so one won't be tempted to buy the same thing for fourfold the price just to have it quickly. Yes, you might have go to the other end of the city, but when you make two lists of the things you need for your costume, one with the cheapest and one with downtown prices, you'll notice the difference. Rather spend that difference on something nice, like for your beloved one who is very patient with your weird hobby. (Or GW's Chaos Black spray paint, like I do. Really, you want to be nice to me, send a can over to old Europe.)
Though my current example isn't costuming related, doing things yourself instead of buying them might also leave you with more money in your pocket. We needed a battle mat for our Dark Heresy party, so I bought a 28x40 inch piece of paper for 50 cents, made an inch grid on one and a centimeter grid on the other side, traveled to the other end of the city and got it laminated for 6.50 dollars. So for 7 dollars I have now a custom battle mat fitting our picky European taste (hex grid? bah!). It would have cost me up to 50 dollars plus shipping (with the chance of it getting lost in the mail) for a commercially available one. Time is money, as they say, and come to think of it, I spared more money doing that mat than what I would have earned in the time that it took to make it including the bus ride.